
| E – LEARNING PLATFORM |
DOCUMENTATION FOR
LECTURERS

E – Learning Lecturer Guide
Revision 2019
Page 1 | 30
Contents
1.0 Introduction ........................................................................................................................ 3
1.1 What is E- Learning?.............................................................................................................. 3
2.0 Accessing the Site ................................................................................................................ 4
2.1 Dashboard .............................................................................................................................. 4
2.1.1 Navigation ............................................................................................................................................5
2.1.2 Recently Accessed Courses .................................................................................................................5
2.1.3 Course Overview .................................................................................................................................5
2.1.4 Calendar ...............................................................................................................................................5
2.1.5 Header .................................................................................................................................................6
2.2 Course homepage .................................................................................................................. 6
2.2.1 Blocks ...................................................................................................................................................7
2.2.2 Grouping users ....................................................................................................................................8
3.0 Resources .......................................................................................................................... 11
3.1 Book ...................................................................................................................................... 11
3.2 File ........................................................................................................................................ 11
3.3 Folder ................................................................................................................................... 12
3.4 IMS content package ............................................................................................................ 12
3.5 Label ..................................................................................................................................... 12
3.6 Page ...................................................................................................................................... 12
3.7 URL ...................................................................................................................................... 12
4.0 Activities ............................................................................................................................ 13
4.1 Assignments ......................................................................................................................... 13
4.2 Chat ...................................................................................................................................... 14
4.3 Choice ................................................................................................................................... 14
4.5 Database ............................................................................................................................... 14
4.6 External tool ......................................................................................................................... 14
4.7 Feedback .............................................................................................................................. 14
4.8 Forum ................................................................................................................................... 14
4.9 Glossary ................................................................................................................................ 15
4.10 Lesson ................................................................................................................................. 15
4.11 Quiz ..................................................................................................................................... 15
4.12 SCORM ................................................................................................................................ 15
4.13 Survey ................................................................................................................................. 15
4.14 Turnitin assignment............................................................................................................ 15
4.15 Wiki ..................................................................................................................................... 15

E – Learning Lecturer Guide
Revision 2019
Page 2 | 30
Workshop ................................................................................................................................... 15
4.16 Big Blue Button ................................................................................................................... 15
4.17 H5P ..................................................................................................................................... 15
4.2 Forums ............................................................................................................................... 16
4.2.1 Forum type ........................................................................................................................ 16
4.2.2 Subscription mode ............................................................................................................ 17
4.2.3 Group mode ...................................................................................................................... 17
5.0 Quizzes .............................................................................................................................. 18
5.1 Questions ............................................................................................................................. 18
5.1.2 Calculated ......................................................................................................................................... 18
5.1.3 Calculated multi-choice .................................................................................................................... 18
5.1.4 Calculated simple.............................................................................................................................. 18
5.1.5 Description........................................................................................................................................ 18
5.1.6 Essay ................................................................................................................................................. 19
5.1.7 Matching ........................................................................................................................................... 19
5.1.8 Embedded Answers (Cloze Test / Gap Fill) ....................................................................................... 19
5.1.9 Multiple choice ................................................................................................................................. 19
5.1.10 Short Answer .................................................................................................................................. 19
5.1.11 Numerical ....................................................................................................................................... 19
5.1.12 Random short-answer matching .................................................................................................... 19
5.1.13 True/False ....................................................................................................................................... 19
5.2 How questions behave in a quiz........................................................................................... 20
5.2.1 Deferred feedback ............................................................................................................................ 20
5.2.2 Adaptive mode and Adaptive mode (no penalties).......................................................................... 20
5.2.3 Manual grading ................................................................................................................................. 20
5.2.4 Interactive mode .............................................................................................................................. 20
5.2.5 Immediate feedback ......................................................................................................................... 20
5.2.6 Deferred feedback or Immediate feedback with Certainty-based marking (CBM) ......................... 20
Conditional questions ................................................................................................................ 20
Question bank ............................................................................................................................ 21
Question categories ................................................................................................................... 21
Question Sharing ........................................................................................................................ 21
Importing questions from an existing file .................................................................................. 21
Reports .................................................................................................................................... 27
Reusing data ............................................................................................................................ 29

E – Learning Lecturer Guide
Revision 2019
Page 3 | 30
1.0 Introduction
This guide is intended for providing an up-to-date procedures and steps on how to use and navigate
through The University of Lusaka E - Learning platform
1.1 What is E- Learning?
E - Learning can be defined as learning utilizing electronic technologies to access educational
curriculum and other resources outside of a traditional classroom. In most cases, it refers to a course,
program or degree delivered completely online or blended with the traditional course delivery.
Unilus E – Learning portal has been implemented using Moodle, an open source online Learning
Management System (LMS), which enables Lecturers to create dynamic courses that, extend
learning, anytime, anywhere.
The heart of Moodle is courses that contain activities and resources. The main power of this activity-
based model comes in combining the activities into sequences and groups, which can help you guide
students through learning paths. Thus, each activity can build on the outcomes of previous ones.
This documentation has been derived from Moodle 3.6 because our E – Learning platform is based
on Version 3.6.
The Learning Management system interacts with the student management system meaning all
students that are registered in a particular semester are automatically enrolled in the LMS and
automatically assigned courses accordingly.
E – Learning Lecturer Guide
Revision 2019
Page 4 | 30
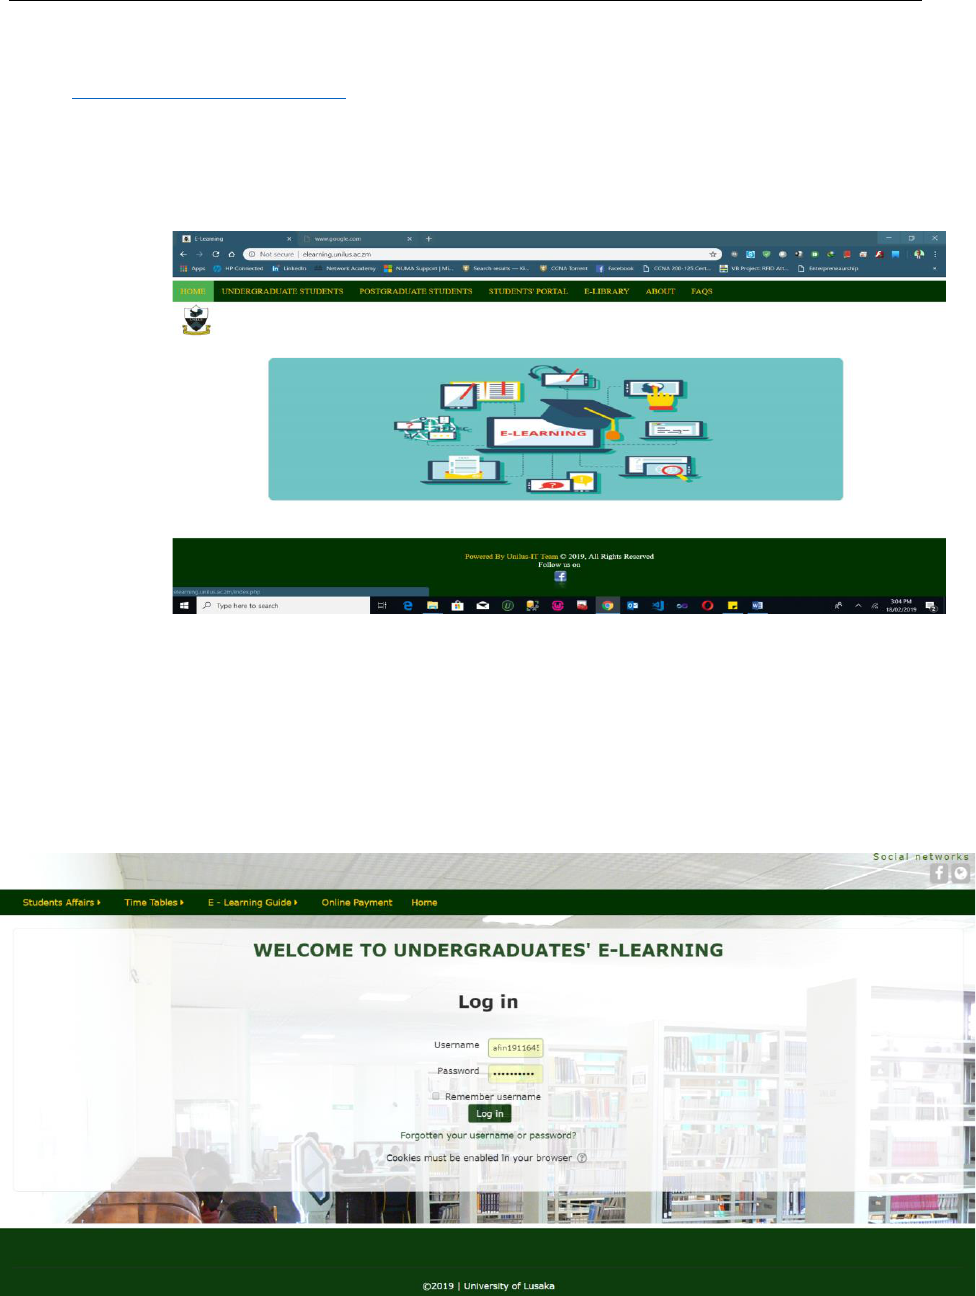
2.0 Accessing the Site
1. Go to the Unilus Website and Click on E-Learning Link or alternatively go to
http://elearning.unilus.ac.zm
2. Select the category
a. Undergraduate: to access all undergraduate programs and students.
b. Postgraduate : to access all Postgraduate programs and students
3. To login in to the Platform
a. Use your staff ID and a default password. You will be prompted to change the
password once you login for the first time.
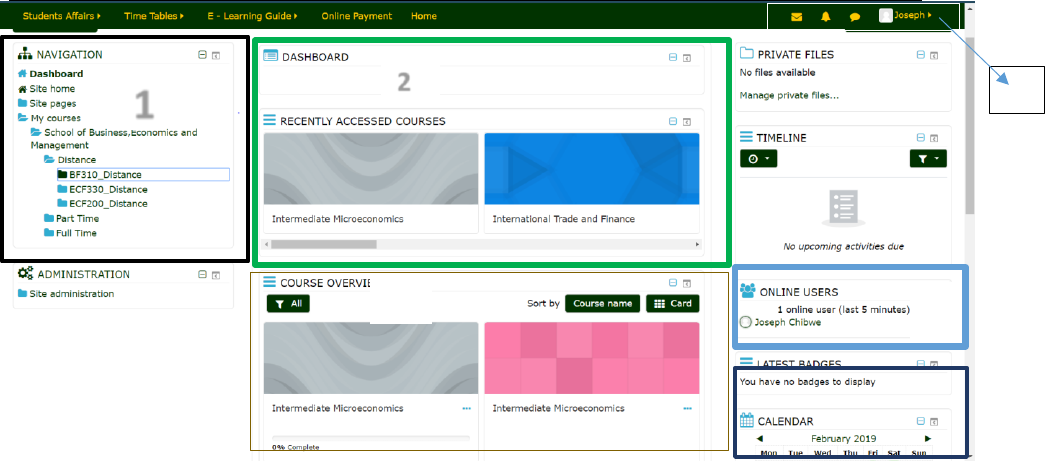
2.1 Dashboard
This is the first page you see once you login into the system as shown below.
E – Learning Lecturer Guide
Revision 2019
Page 5 | 30
2.1.1 Navigation
• This where you will find quick link to access your courses and other features.
• To easily access your courses click on my courses in the Navigation menu
• To access your course simply click on the course code name in the Navigation Menu
2.1.2 Recently Accessed Courses
• This will show recently accessed courses
• To quickly go to course, simply click on named of the courset.
2.1.3 Course Overview
• This will list all courses you have been assigned to. This corresponds to courses in the
registered for in the student Management System.
2.1.4 Calendar
• This shows all the Events from the Administrator, Courses Assignments reminders, forum
subscription and Event that a lecturer creates for students.
1
2
3
4
5
6

E – Learning Lecturer Guide
Revision 2019
Page 6 | 30
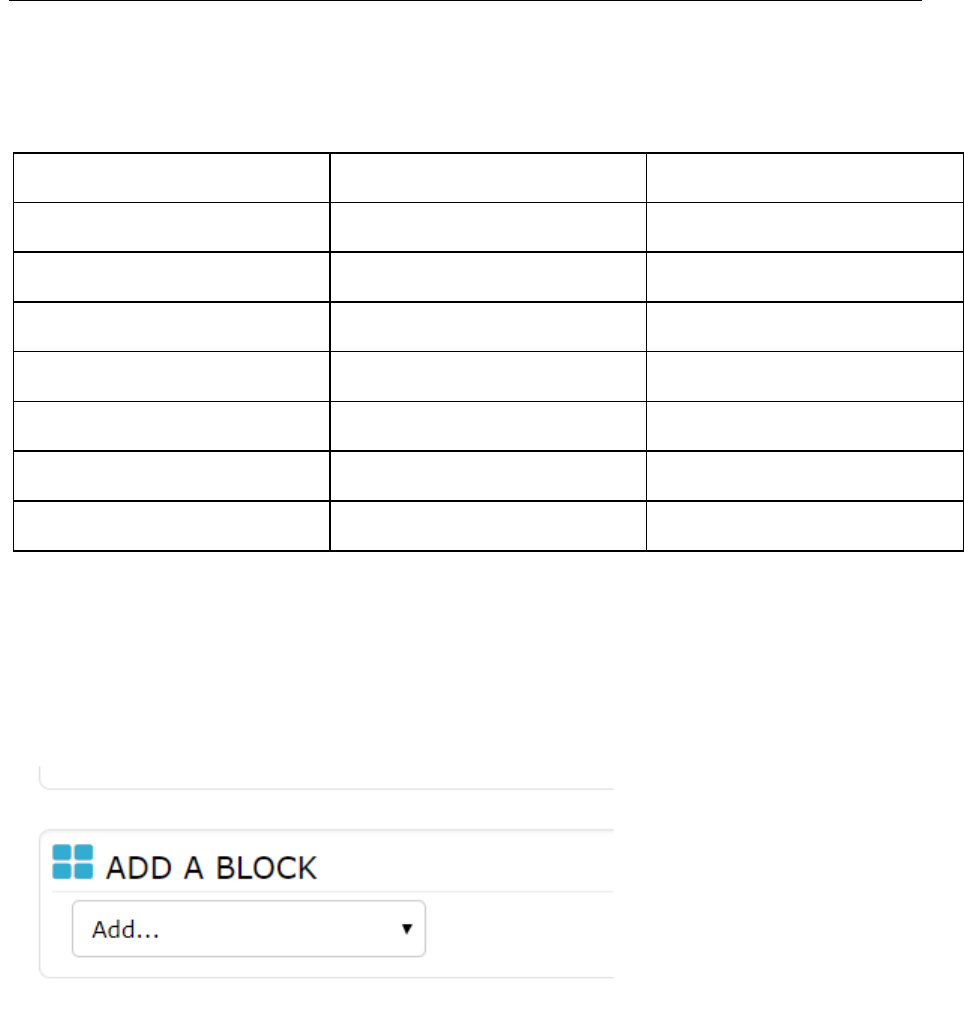
2.1.5 Header
Tool
Description
Settings
Contains several options to edit the course, view students grades, restore
or backing up of the course and many more
Go to Bottom
This tool is used to go to the bottom of the page
Mail
To send E Mail within the platform to all students who are registered in
the particular course. Note: A Lecturer can only send mails to students
registered in that particular course.
Notification
This notifies the user of current notifications, it can be upcoming events,
email notifications, messages or update messages
Messages
Similar to mail the only different is that Messages are site wise, meaning
lecturer can interact with anyone registered on the platform. Unlike Mail
this one as no provision for attaching documents
User
This is a user menu: contains options for editing of the profile and
logging out of the system
2.2 Course homepage
Many course options determine a course's appearance and make it look very different from our
examples. In this example, the course has a header, a footer (both content largely determined by a
theme) and 3 columns in the middle.
The above shows an example of Topical format, teacher view, edit off
1
2
3
4
5
1
2
3
4
5
6
E – Learning Lecturer Guide
Revision 2019
Page 7 | 30
Using the above image, here are the parts of a typical course homepage. It is possible to move and
hide parts of the. For example, you can move (or delete) all blocks from the right column to the left.
That will leave more space for the middle column.
Left Column
Course sections - Center
Right Column
1 Course full name
6 Module Header
9 Login information
2 Navigation bar
7 Assignment Header
10 Turn editing on button
4 Navigation block
8 Announcement
11 Latest news
5 Administration block
12 Upcoming events
14 "Switch role to"
13 Recent activity
15 User profile settings
16 Site administration
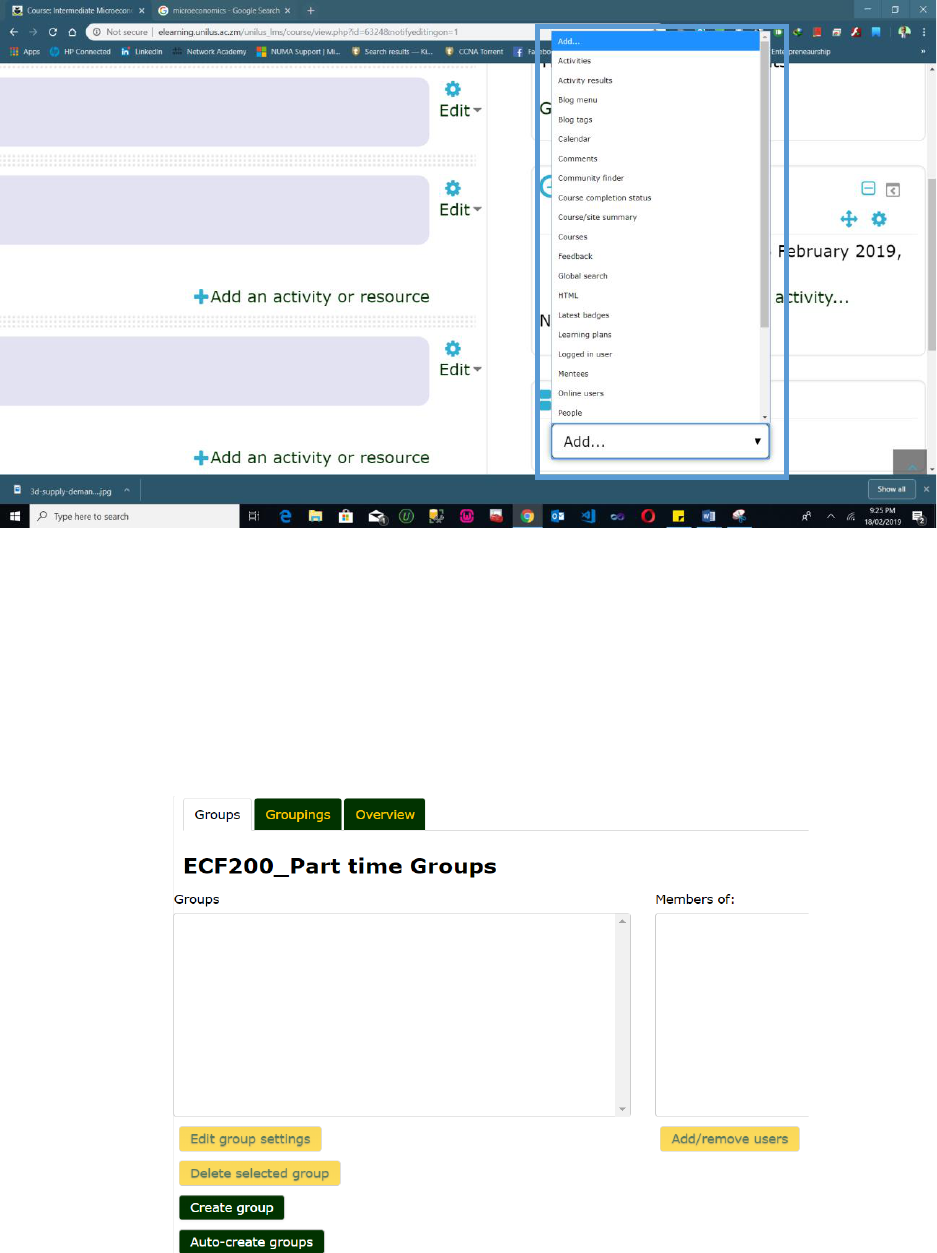
2.2.1 Blocks
A Block is an item that a Lecturer can add to the left or right of a Moodle course page. They provide
extra information or links to aid learning. A Lecturer can add blocks by turning on the editing and
choosing from the "Add a block" drop down which is usually on the bottom right side of the course
page. Blocks usually appear on the sides of the course.
Any block can be made 'sticky' so that it appears in all the contexts below, such as throughout a
course or a particular activity. Note that it is also possible to dock blocks if desired.
E – Learning Lecturer Guide
Revision 2019
Page 8 | 30
2.2.2 Grouping users
Groups: On the course level can you assign a user to one (or more) groups. In a course you can
assign an activity to a group.
Groupings are a collection of groups. You can assign a grouping to a context like an assignment.
A group or grouping can be used on two levels:
• Course level - The group mode defined at the course level is the default mode for all
activities defined within that course. To use groups you need first to set a group mode in
Administration > Course administration > Edit settings.

E – Learning Lecturer Guide
Revision 2019
Page 9 | 30
• Activity level - Each activity that supports groups can also have its own group mode
defined.
2.2.3 Group modes
There are three group modes
• No groups - There are no sub groups, everyone is part of one big community
• Separate groups - Each group can only see their own group, others are invisible.
• Visible groups - Each group works in their own group, but can also see other groups. (The
other groups' work is read-only.)
Using groups with discussion forums allow Lecturers to restrict interaction between students.
Separate groups mean only students in the same group can see and participate in discussions within a
particular forum. Visible groups allow students to see other group's discussions, but only participate
in their own group's discussions.
2.2.4 Creating a group within the course
1. Click the 'Create group' button in Administration > Course administration > Users >
Groups
2. Add a group name and optional description, enrolment key and picture
3. Click the 'Save changes' button
4. Select the group to which you want to add participants, then click the 'Add/remove users
button
5. In the "Potential members" list, select the users you want to add to the group. Multiple users
may be selected using the Crtl key.
6. Click the Add button to add the users to the group
Groups may be created automatically via the 'Auto-create groups' button in Administration > Course
administration > Users > Groups.
2.3.5 Restricting an activity, resource or course topic to a particular group
The main functionality of the groups is that you can separate the tasks between the groups, make the
assessment being sent in by the groups, and ease the management of the course tasks while making it
more directed.
E – Learning Lecturer Guide
Revision 2019
Page 10 | 30
To be able to restrict an activity, resource or course topic to a group, Conditional activities must be
enabled. This will result in a 'Restrict access' section in the activity, resource or topic settings and a
group restriction can then be added.
E – Learning Lecturer Guide
Revision 2019
Page 11 | 30
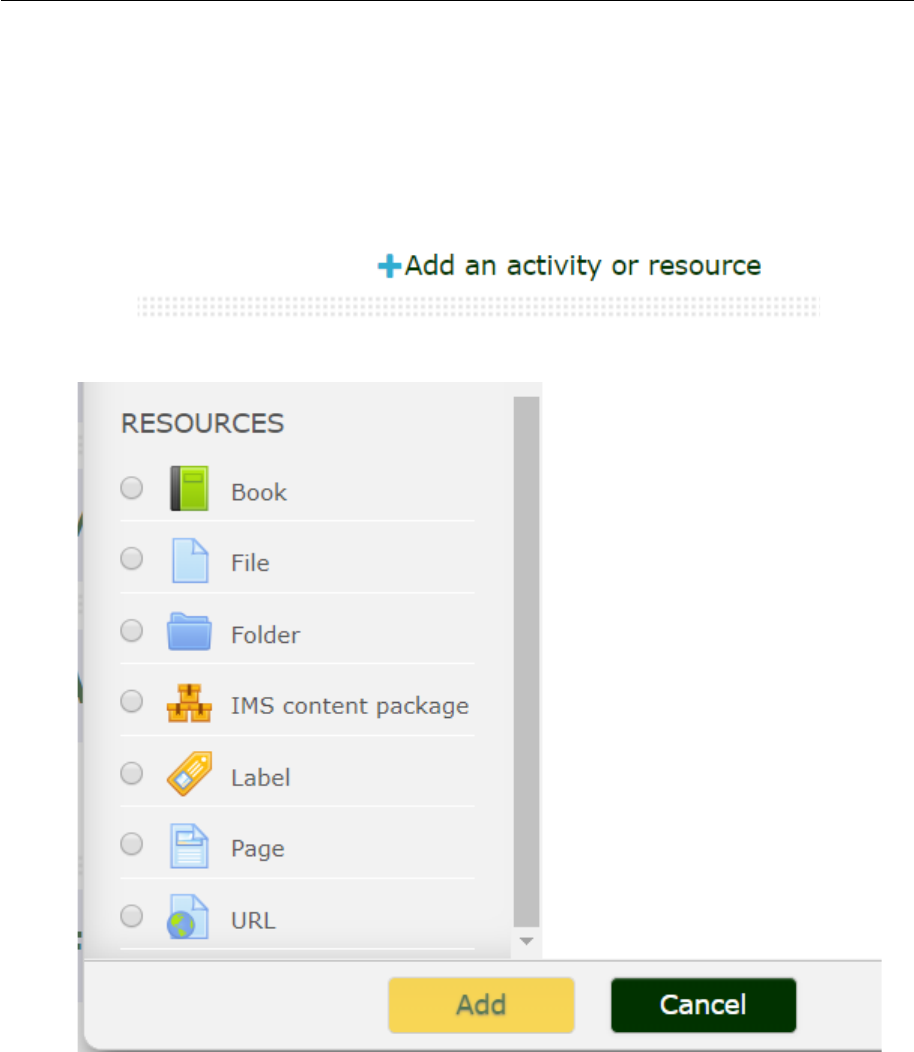
3.0 Resources
A Resource in the Learning platform is an item that a Lecturer can add to a course to support
learning, such as a file, a video or link to a website. A resource differs from an activity in that it is
static; i.e. the student can merely look at or read it, rather than participate.
A Lecturer can add resources by turning on the editing and by clicking Add an activity or resource in
a course section. Resources usually appear in the central area of the course.
3.1 Book
Multi-page resource with a book-like format, the book module allows you to have main chapters and
sub chapters. The book module is not interactive. You can, however, link to choices, forums etc., or
include multimedia content.
3.2 File

E – Learning Lecturer Guide
Revision 2019
Page 12 | 30
When you wish to share with your students a simple file such as a Word-processed document or
slideshow (e.g. created in MS Word, PowerPoint, or Open Office) you use the file resource type.
How your students access them depends on your choices in File resource settings. Note also that they
will only be able to open your files if they have the appropriate software on their own computers.
There is now the possibility to drag & drop files directly from your computer to the core course
page.
3.3 Folder
For helping organize files. The resources may be of different types. Using a folder to display
resources is neater and takes up less space than displaying files one by one in a list. The downside is
that at present you are forced to download files stored in a folder resource.
3.4 IMS content package
Add static material from other sources in the standard IMS content package format.
3.5 Label
A label serves as a spacer on a Moodle course page. It can be used to add text, images, multimedia or
code in between other resources in the different sections. It is a very versatile resource and can help
to improve the appearance of a course. Banners or descriptions may be added to labels to distinguish
between and highlight different areas.
3.6 Page
The student sees a single, scrollable screen that a teacher creates with the robust HTML editor. A
page resource creates a link to a screen that displays the content created by the teacher.
3.7 URL
You can send the student to any place they can reach on their web browser.
E – Learning Lecturer Guide
Revision 2019
Page 13 | 30
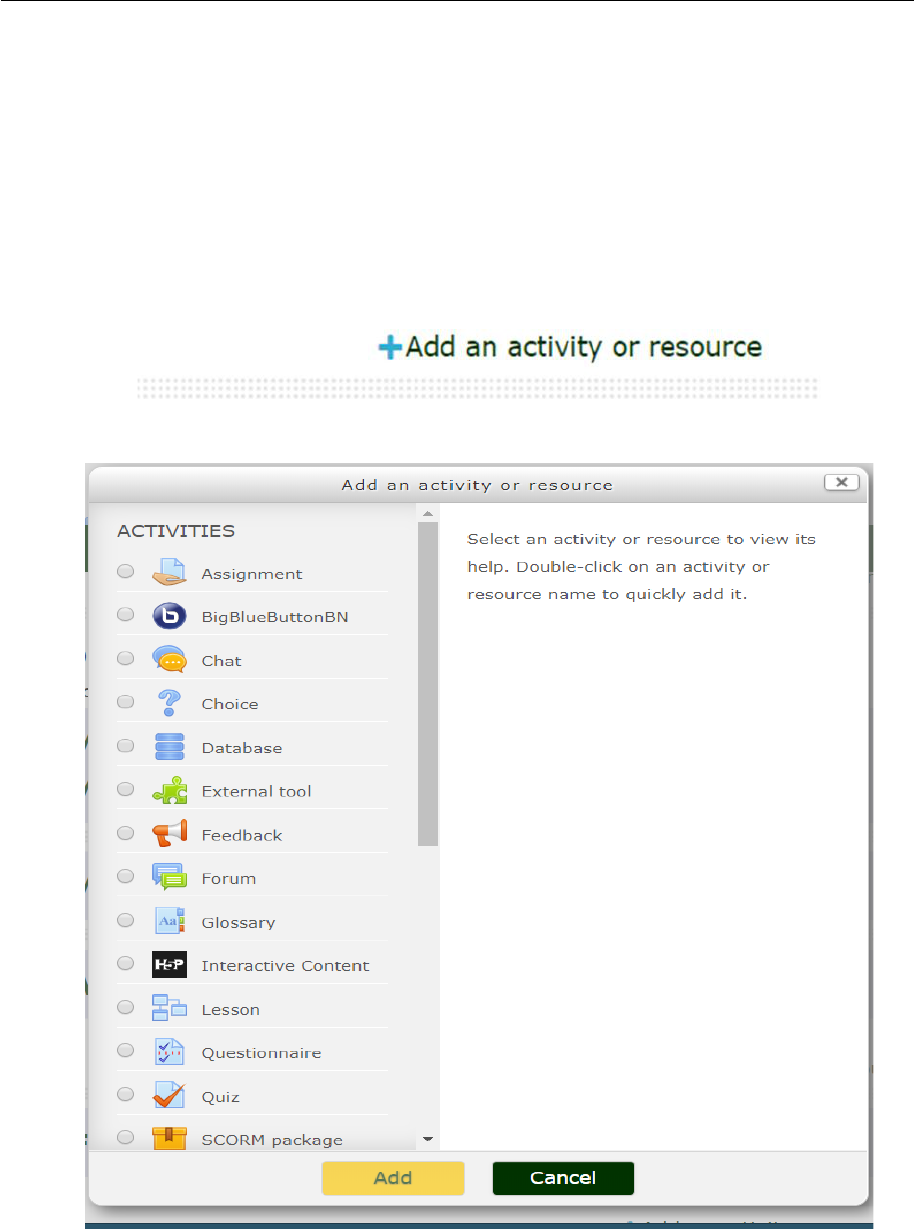
4.0 Activities
An Activity in Moodle is a feature where students learn by interacting with each other or with their
teacher. They might for instance contribute in a forum, upload an assignment, answer questions in a
quiz or collaborate together in a wiki. Activities can be graded.
A teacher can add activities by turning on the editing and choosing an activity by clicking Add an
activity or resource in a course section. Activities usually appear in the central area of the course.
4.1 Assignments
Enable teachers to grade and give comments on uploaded files and assignments created on and off
line. The work students submit is visible only to the teacher and not to the other students unless a
group assignment is selected. Very useful. Note that deadlines set in the assignments settings will
appear automatically in the course calendar.

E – Learning Lecturer Guide
Revision 2019
Page 14 | 30
4.2 Chat
Allows participants to have a real-time synchronous discussion. Not useful: distracts students, does
not keep logs.
4.3 Choice
A teacher asks a question and specifies a choice of multiple responses.
4.5 Database
Enables participants to create, maintain and search a bank of record entries. The format and structure
of these entries can be almost unlimited, including images, files, URLs, numbers and text amongst
other things.
4.6 External tool
Allows participants to interact with LTI compliant learning resources and activities on other web
sites.
4.7 Feedback
For creating and conducting surveys to collect feedback. The Feedback module allows you to create
and conduct surveys to collect feedback. Unlike the Survey tool it allows you to write your own
questions, rather than choose from a list of pre-written questions and unlike
the Quiz tool, you can create non-graded questions. The Feedback activity is ideal for the likes of
course or teacher evaluations.
4.8 Forum
Allows participants to have asynchronous discussions. Very useful (more than you can think at first).

E – Learning Lecturer Guide
Revision 2019
Page 15 | 30
4.9 Glossary
Enables participants to create and maintain a list of definitions, like a dictionary. Quite useful but
does not offer the possibility to export the content in a well-formatted format.
4.10 Lesson
For delivering content in flexible ways. Basically a set of organized pages.
4.11 Quiz
Allows the teacher to design and set quiz tests, which may be automatically marked and feedback
and/or to correct answers shown. Very useful.
4.12 SCORM
Enables SCORM packages to be included as course content. SCORM packages are interactive e-
learning capsules created by a specific software such as Articulate Storyline.
4.13 Survey
For gathering data from students to help teachers learn about their class and reflect on their own
teaching. Not very useful: the questions are pre-defined and not modifiable.
4.14 Turnitin assignment
Creates a Turnitin Moodle Direct assignment which links an activity in Moodle to an assignment /
assignments on Turnitin.
4.15 Wiki
A collection of web pages that anyone can add to or edit. Quite complex – I recommend to use this
kind of activity only with students who are comfortable with computers.
Workshop
Enables peer assessment. Students submit their work via an online text tool and attachments. There
are two grades for a student: their own work and their peer assessments of other students' work.
4.16 Big Blue Button
Enables live video sessions between lecturers and students. Students in different locations can ask,
participate in a live video or audio presentation.
4.17 H5P
The H5P activity module enables lecturers or instructors to create interactive content such as
Interactive Videos, Question Sets, Drag and Drop Questions, Multi-Choice Questions, Presentations
and much more.
In addition to being an authoring tool for rich content, H5P enables the ability to import and export
H5P files for effective reuse and sharing of content.
E – Learning Lecturer Guide
Revision 2019
Page 16 | 30
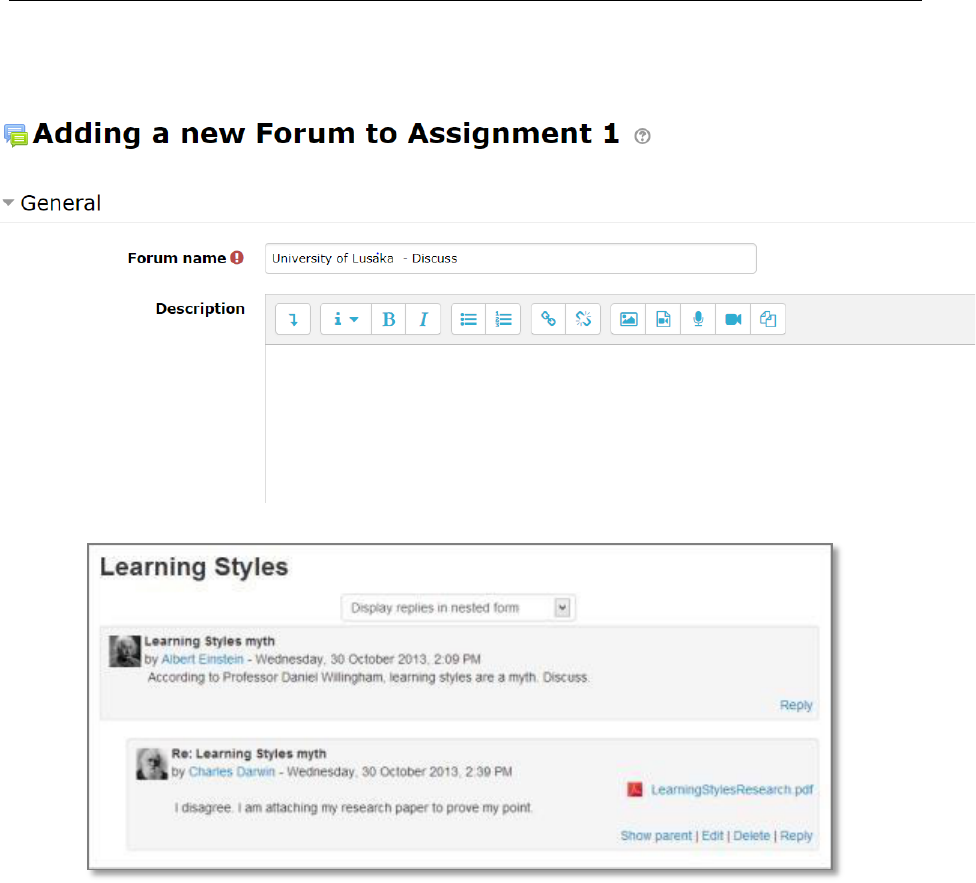
4.2 Forums
The forum module is an activity where students and teachers can exchange ideas by posting
comments. Forum posts can be graded by the teacher or other students.
A forum can contribute significantly to successful communication and community building in an
online environment. You can use forums for many innovative purposes in educational settings, but
teaching forums and student forums are arguably the two more significant distinctions.
You can access an existing forum by clicking the configure icon or clicking on the forum and then
Administration > Forum administration > Edit settings.
The forum module is very useful as you can customize it and adapt it to many activities such as
general discussion, group activities, general information, FAQ… In addition it is very easy to use,
even by students who are not very comfortable with computers.
4.2.1 Forum type
There are five forum types to choose from:
• A single simple discussion - A single topic discussion developed on one page, which
is useful for short focused discussions (cannot be used with separate groups)
• Standard forum for general use - An open forum where anyone can start a new topic

E – Learning Lecturer Guide
Revision 2019
Page 17 | 30
at any time; this is the best general-purpose forum
• Each person posts one discussion - Each person can post exactly one new discussion
topic (everyone can reply to them though)
• Q and A Forum - Instead of initiating discussions participants pose a question in the
initial post of a discussion. Students may reply with an answer, but they will not see
the replies of other Students to the question in that discussion until they have
themselves replied to the same discussion.
• Standard forum displayed in a blog-like format
Note: News forum is a special type of forum that is automatically created with a new course.
4.2.2 Subscription mode
When a user is subscribed to a forum it means that they will receive notification (via popup and/or
email) of each new posting. By default, posts are recorded about 30 minutes after the post was first
written.
People can usually choose whether or not they want to be subscribed to each forum. However, the
teacher can choose to force subscription on a particular forum then all course users will be
subscribed automatically, even those that enrol at a later time.
There are 4 subscription mode options:
1. Optional subscription - Participants can choose whether to be subscribed
1. Forced subscription - Everyone is subscribed and cannot unsubscribe
2. Auto subscription - Everyone is subscribed initially but can choose to unsubscribe at any
time
3. Subscription disabled - Subscriptions are not allowed.
The subscription mode and subscribe or unsubscribe links appear in Navigation>Forum
administration when viewing the forum.
4.2.3 Group mode
The group mode setting has three options:
1. No groups
2. Separate groups - each group can only see their own group; others are invisible
• Teachers can start discussion topics for all participants or for a selected group.
• Students can only start and participate in discussions for their own group.
3. Visible groups - each group works in their own group, but can also see other groups
• Teachers can start discussion topics for all participants or for a selected group.
• Students can only start and participate in discussions for their own group.

E – Learning Lecturer Guide
Revision 2019
Page 18 | 30
Teachers can view and post in all forum discussions, regardless of the group mode setting.
Note: Single simple discussions cannot be set to separate groups. If required, a permissions override
may be set to prevent students from starting new discussions.
5.0 Quizzes
The Quiz activity module allows the teacher to design and build quizzes consisting of a large variety
of Question types, including multiple choice, true-false, and short answer questions. These questions
are kept in the Question bank and can be re-used in different quizzes.
Quizzes can be configured to allow multiple attempts. Each attempt at a question is automatically
marked, and the teacher can choose whether to give feedback and/or show the correct answers.
Be sure to test your quizzes before opening them to the students. As this module is highly
customizable, it is easy to forget something and have unexpected behaviors.
5.1 Questions
Questions can be created in Moodle for use in quizzes and for import into lessons. They can be of the
following types:
5.1.2 Calculated
Calculated questions offer a way to create individual numerical questions by the use of wildcards
that are substituted with individual values when the quiz is taken.
5.1.3 Calculated multi-choice
Calculated multichoice questions are like multichoice questions with the additional property that the
elements to select can include formula results from numeric values that are selected randomly from a
set when the quiz is taken.
The main difference is that the formula is included in the answer choice as {=...} i.e. if you calculate
the surface of a rectangle {={l}*{w}}.
5.1.4 Calculated simple
Simple calculated questions offer a way to create individual numerical questions whose response is
the result of a numerical formula which contain variable numerical values by the use of wildcards
(i.e. {x} , {y}) that are substituted with random values when the quiz is taken.
5.1.5 Description
This question type is not actually a question. It just prints some text (and possibly graphics) without
requiring an answer. This can be used to provide some information to be used by a subsequent group
of questions.

E – Learning Lecturer Guide
Revision 2019
Page 19 | 30
5.1.6 Essay
This allows students to write at length on a particular subject and must be manually graded.
It is possible for a teacher to create a template to scaffold the student's answer in order to give them
extra support. The template is then reproduced in the text editor when the student starts to answer the
question.
5.1.7 Matching
A list of sub-questions is provided, along with a list of answers. The respondent must "match" the
correct answers with each question.
5.1.8 Embedded Answers (Cloze Test / Gap Fill)
These very flexible questions consist of a passage of text that has various answers embedded within
it, including multiple choice, short answers and numerical answers.
5.1.9 Multiple choice
With the Multiple Choice question type you can create single-answer and multiple-answer questions,
include pictures, sound or other media in the question and/or answer options (by inserting HTML)
and weight individual answers.
5.1.10 Short Answer
In response to a question (that may include an image), the respondent types a word or phrase. There
may several possible correct answers, with different grades. Answers may or may not be sensitive to
case. I strongly recommend not using this type of question as a simple blank space at the end of a
student’s answer will lead to a “0” grade.
5.1.11 Numerical
From the student perspective, a numerical question looks just like a short-answer question. The
difference is that numerical answers are allowed to have an accepted error. This allows a continuous
range of answers to be set.
5.1.12 Random short-answer matching
From the student perspective, this looks just like a Matching question. The difference is that the sub-
questions are drawn randomly from Short Answer questions in the current category.
5.1.13 True/False
In response to a question (that may include an image), the respondent selects from two options: True
or False.

E – Learning Lecturer Guide
Revision 2019
Page 20 | 30
5.2 How questions behave in a quiz
The following question behaviors are available when creating a quiz:
5.2.1 Deferred feedback
Students must enter an answer to each question and then submit the entire quiz, before anything is
graded or they get any feedback.
5.2.2 Adaptive mode and Adaptive mode (no penalties)
Allows students to have multiple attempts at the question before moving on to the next question.
This behaviour requires that the "Whether correct" box is ticked under "During the attempt" in the
"Review options" section, at a minimum.
5.2.3 Manual grading
Used for essay questions (irrespective of what the quiz is set to) but you can now choose to have
every question in the quiz manually graded, if you wish.
5.2.4 Interactive mode
After submitting one answer, and reading the feedback, the student has to click a 'Try again' button
before they can try a new response. They can be given hints to help them. Once the student has got
the question right, they can no longer change their response. Once the student has got the question
wrong too many times, they are just graded wrong (or partially correct) and get shown the feedback
and can no longer change their answer. There can be different feedback after each try the student
makes. The number of tries the student gets is the number of hints in the question definition plus one.
5.2.5 Immediate feedback
Similar to interactive mode in that the student can submit their response immediately during the quiz
attempt, and get it graded. However, they can only submit one response, they cannot change it later.
5.2.6 Deferred feedback or Immediate feedback with Certainty-based marking (CBM)
With CBM, the student does not only answer the question, but they also indicate how sure they are
they got the question right. The grading is adjusted by the choice of certainty, so that students have to
reflect honestly on their own level of knowledge in order to get the best mark.
Conditional questions
If using the Interactive with multiple tries or Immediate Feedback behavior and with the navigation
method set to 'Free', it is possible to make the display of a question dependent on a previous question
being answered first.

E – Learning Lecturer Guide
Revision 2019
Page 21 | 30
Question bank
Questions are stored in the course Question bank. This feature allows a teacher to create, preview,
and edit questions in a database of question categories. The teacher enters the question bank by
creating or editing a quiz activity or via Settings > Course administration > Question bank.
Question categories
Questions can be organized into Question categories and shared with other teachers. The categories
can be limited to being used on the site, course or quiz level.
You can imagine a question category as a folder on your desktop computer. Then, questions are
stored in these categories in a similar way as your files are stored in a file system.
You can create a category hierarchy. For example, you can specify a parent category for each
category or the 'Top' as the parent, when a category has no parent.
Question Sharing
You can share questions in several different contexts. Sharing categories in the 'System' context or
'Course' context has a similar effect to publishing the category so others can see them or hiding a
question category from specific users.
By default a course teacher cannot see or use any Question context above the course level.
Importing questions from an existing file
Moodle has a number of different formats that can be used to import or export questions.
It is possible to import questions from a file on your network/computer or from a file that has been
saved or uploaded into your course files. The underlying character encoding of this file is important.
Note: Moodle XML format is the recommended import question type format as it enables the
maximum amount of question data (such as question feedback) to be imported.
It is not possible to import questions from .xls, .xlsx, doc or docx files, but there is a possibility to
generate GIFT files from Excel. It is quite complicated, but you can find instructions as well as an
.xls template at this address: https://moodle.org/mod/forum/discuss.php?d=66660#p309302
Export questions
Questions may be exported from the Quiz module and the Question bank in any one of 3 formats:
• GIFT format
• Moodle XML format
• XHTML format
These files need to be edited with a text editor (e.g. notepad) and are not compatible with Excel.

E – Learning Lecturer Guide
Revision 2019
Page 22 | 30
Grades
All the grades for each student in a course can be found in the course gradebook, or 'Grader report' in
Administration > Course administration > Grades. Note that this is for your personal use, limited to
your course. All Graduate Institute Students have their grades centralized in Campus, the Graduate
Institute academic system. As of this writing this is not so for Executive Education Programmes.
The grader report collects items that have been graded from the various parts of Moodle that are
assessed, and allows you to view and change them as well as sort them out
into categories and calculate totals in various ways. When you add an assessed item in a Moodle
course, the gradebook automatically creates space for the grades it will produce and also adds the
grades themselves as they are generated, either by the system or by you.
The grades displayed are initially displayed as the raw marks from the assessments themselves, e.g.
an essay out of 36 will appear as however many raw marks that student got, not a percentage
(although this can be changed later).
The gradebook allows for smooth and stable scrolling horizontally and vertically through grades. It
uses the whole window, making it accessible on all platforms.
Course grade settings
Course grade settings determine how the gradebook appears for all participants in the course.
Course grade settings are found in Administration > Grade administration > Course grade settings
or via the gradebook Settings tab.

E – Learning Lecturer Guide
Revision 2019
Page 23 | 30
Grader report preferences
Teachers can set their preferences for the grader report via 'My preferences'. These settings will
apply to all courses for that teacher. The teacher may change them at any time.
For example it's possible to set the grader report to only show active participants or all participants
(including suspended users) from the Show only active enrolments setting.
The default number of students per page (grade_report_studentsperpage) can safely be increased
without any loss of data when grading large numbers of students with many assignments.
Activity-based grade items
A number of activities such as Assignment, Workshop, Lesson, Quiz and others communicate their
grades to the gradebook. The generated grade item can later be edited directly from Course
administration > Grades, but this will then freeze it in the activity itself, meaning a teacher who has
edited an assignment grade in the gradebook will not be able then to change it from the assignment,
unless they unlock it in the gradebook.
Importing grades
Grades may be imported as a CSV or XML file, or by pasting from a spreadsheet. The import file
format is the same as the corresponding export format.
Note 1: Grade import is equivalent to manual grading in the grader report. Thus, if grades for a
particular Moodle activity such as an assignment are imported, they can no longer be edited via the
assignment submission page.
Note 2: Importing feedback will also overwrite any grades that are linked to that assessment. Please
include both feedback and grades for the activity when mapping and importing grades via CSV. If
both columns are not included then all grades for that activity will be lost.
Grade export
Grades can be exported to Excel spreadsheet, OpenDocument spreadsheet, plain text file or XML
file, or published via a URL.
Grade export is NOT intended for students.
To export grades from the gradebook:
1. Choose an export format from the gradebook dropdown menu or in the Administration
block under Grade administration > Export.
2. Set options as required.
3. If the course uses groups, select whether to export grades for all participants or for a
particular group.
E – Learning Lecturer Guide
Revision 2019
Page 24 | 30
4. Select the grade items to be included. Note that ID numbers are required for all activities for
XML file export. An ID number field can be found in the common module settings for each
activity.
5. Click the export button.
Tracking progress
Course completion
Allows for a course to be officially marked as finished, either manually or automatically according to
specified criteria.
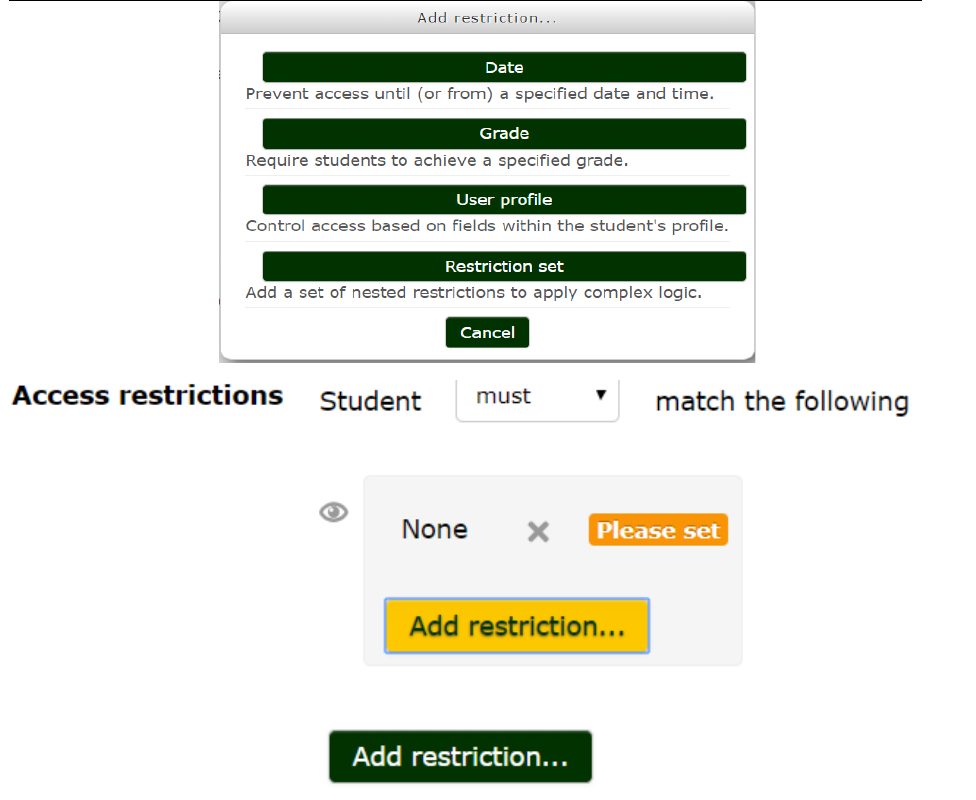
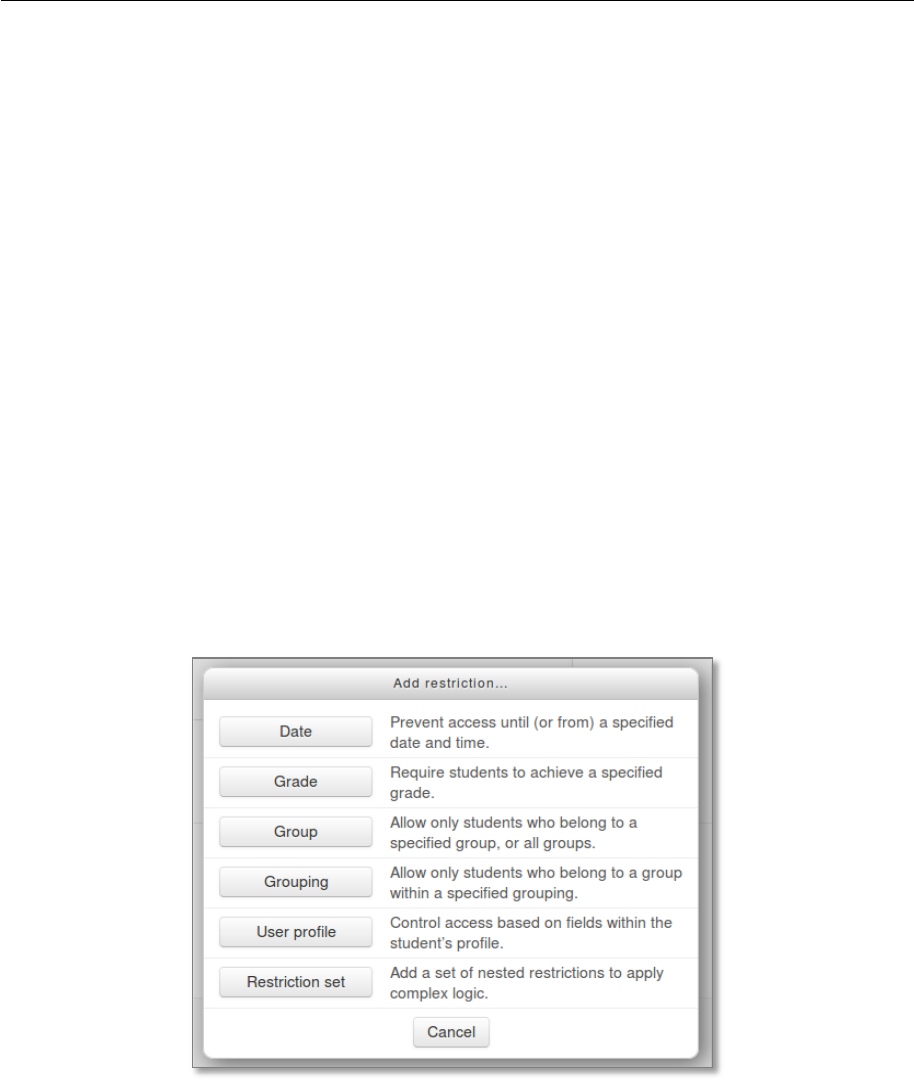
Conditional activities
A group of settings in a resource or activity which sets conditions upon entry into, or if an activity or
resource can be even seen by the student. A 'restrict access' section appears on the 'Activity settings'
screen.
After clicking the 'Add restriction' button, a choice of conditions appears:
A basic example
Students are required to undertake view a page explaining the course before posting an introductory
message in a forum.
How's it done? In task 1 the activity completion condition is set to require view
E – Learning Lecturer Guide
Revision 2019
Page 25 | 30
Should you really use conditional activities?
Conditional activities are a way for you to force your students to do things in a certain order. Is that
really what you want? The answer will depend on your particular circumstances, but it is worth
taking a moment to reflect upon the degree to which conditional activities are appropriate for your
course. Some may prefer to use labels and layout rather than locks and keys to direct the learning
path.
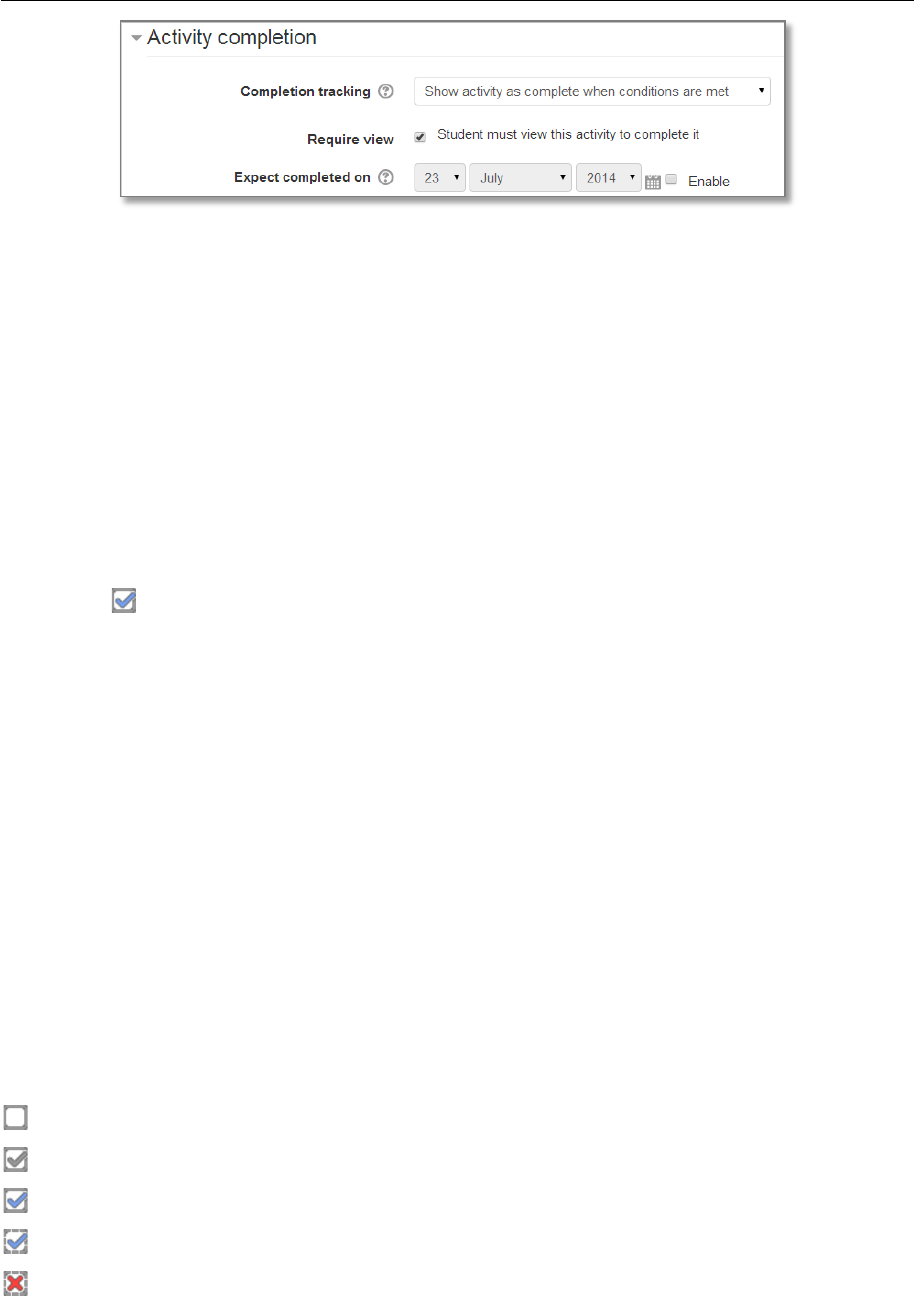
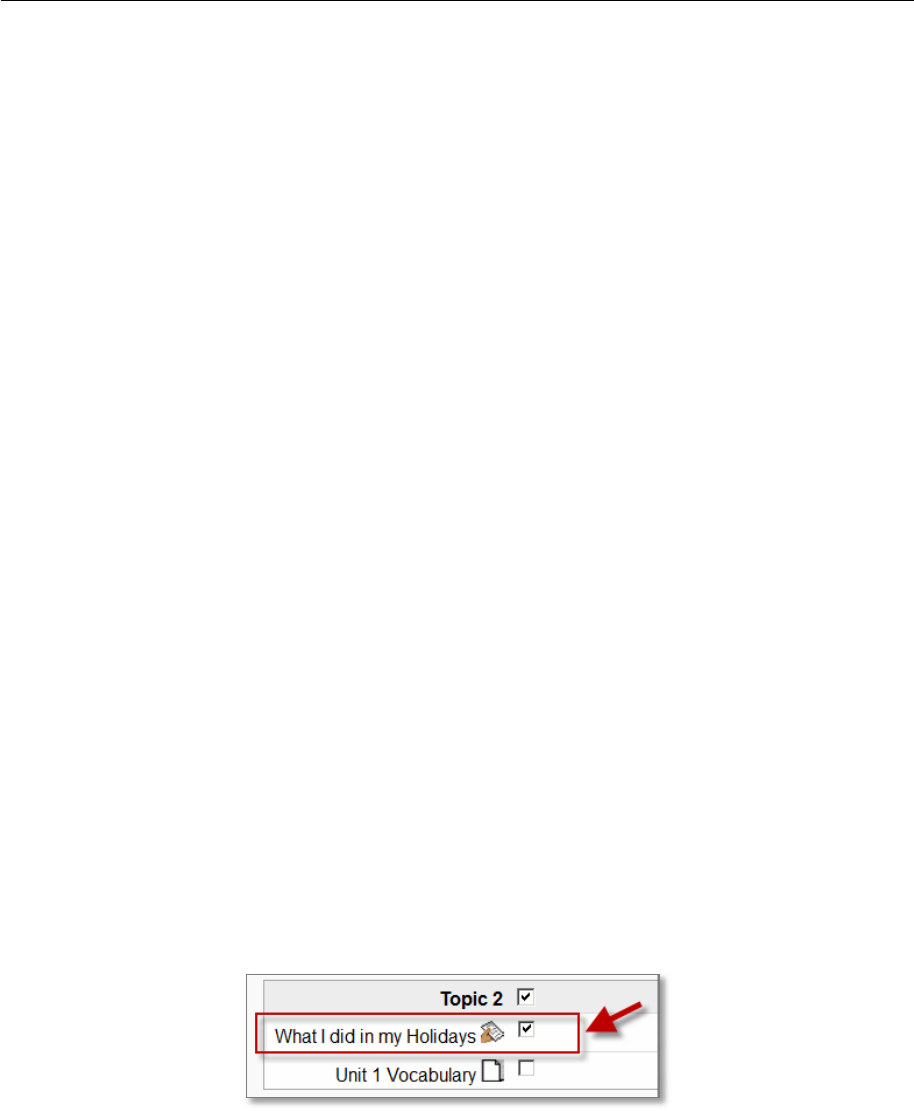
Activity completion
Activity completion allows the teacher to set completion criteria in a specific activity's settings. A
check (tick) appears against the activity when the student meets this criterion. The criterion might
be viewing, receiving a certain score or a student marking it as complete.
Why use Activity completion?
If this feature is enabled, it is a helpful way for students to be able to track their progress in a course.
The student has an easy to see checklist of what they have done so far.
It can also be linked to Course completion in order to allow both students and teachers to watch
progress through a course. As each activity is checked off as "complete", the student moves further
towards final completion of the course.
It can also be linked to Conditional activities in order to allow the teacher to set criteria upon which a
student is allowed to progress through a course and access materials.
Activity completion icons
manual - not yet marked as complete
manual - enabled
manually completed
automatically completed
automatically failed
automatic - not completed

E – Learning Lecturer Guide
Revision 2019
Page 26 | 30
automatically passed
automatic - enabled
Activity settings
Depending on the type of activity, there are different completion requirements. For example, a Page
might have the requirement to require view; a Quiz might have the requirement to require grade
while a Forum might have the requirement to require posts/discussions/replies.
Common settings for most graded activities
Completion tracking
There are three options:
• Do not indicate activity completion - this will not show checks (ticks) next to the activity
• Students can manually mark the activity as completed - students press the check (tick) to
change it. (Note: they can do this even without doing the activity!)
• Show activity as complete when conditions are met - the selected completion criteria must
be met before the check (tick) will change style
Locked completion options
If at least one person has completed an activity, completion options are 'locked'. This is because
changing these options may result in unexpected behaviour. For example, if somebody has ticked an
activity as manually completed, and you then set it to automatic completion, the activity will become
unticked - very confusing for the student who had already ticked it!
Activity completion report
Activity completion info can be viewed in Administration> Course administration> Reports >
Activity completion.
E – Learning Lecturer Guide
Revision 2019
Page 27 | 30
Reports
Logs of course activity
A log of activity in the course may be generated by a teacher in Administration> Course
administration>Reports > Logs.
Note that the generated log will contain any action performed by the users, such as clicks on links or
access to course pages, and is usually too detailed to be really useful for teachers.
Course activity report
A course activity report, showing the number of views for each activity and resource (and any related
blog entries), can be viewed in Administration > Course administration > Reports
> Activity report.
An activity report is computed from the course's start date (in the course settings).
Individual activity reports
If activity reports are enabled for a course in the course settings, each course participant can access
reports of their contributions, such as forum posts or assignment submissions, logs and a statistics
report.
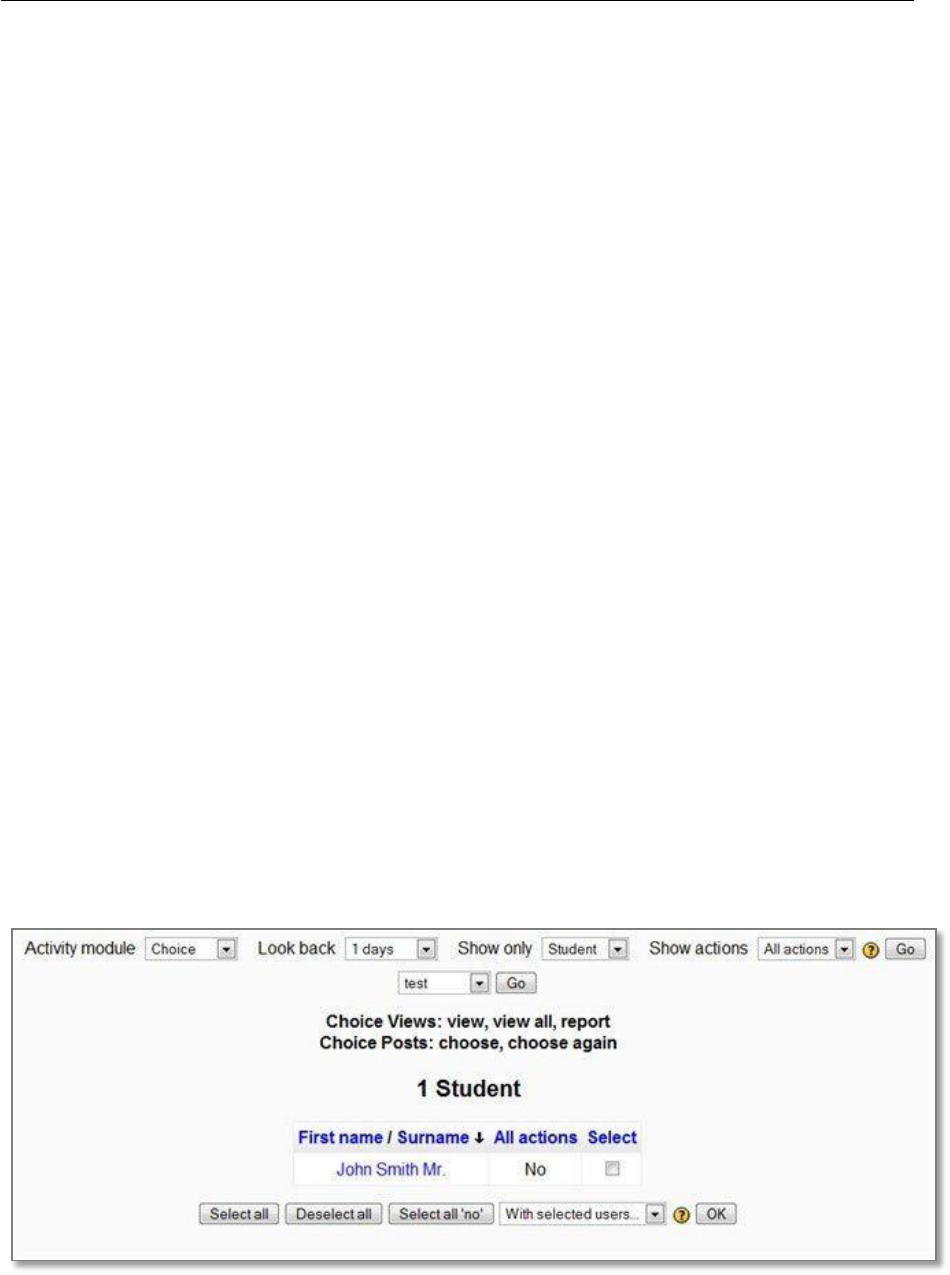
Participation report
A participation report for a particular activity can be in Administration > Course administration >
Reports > Course participation.
The definition of View and Post for the selected activity type will be given on screen. For example:
• Forum View: View Discussion, Search, Forum, Forums, Subscribers

E – Learning Lecturer Guide
Revision 2019
Page 28 | 30
• Forum Post: Add Discussion, Add Post, Delete Discussion, Delete Post, Move Discussion,
Prune Post, Update Post
An extremely useful feature of the participation report is the option to send a message to all students
who have not completed a certain action. Other options with selected users are to add a note or
extend enrolment.
Activity completion report
Activity completion info can be viewed in Administration> Course administration> Reports >
Activity completion.
In my opinion, this is the most important report. It will allow you to track the activities completed by
the students.
Note that this report will only appear if you enable the activity completion tracking in your course
setting!
E – Learning Lecturer Guide
Revision 2019
Page 29 | 30
Reusing data
There are several ways to reuse a course or parts of a course.
Clone resource/activity
In edit mode use the x2 icon to duplicate the activity or resource. This is very useful when you want
to create several similar items. You will then change the content only and won’t need to set all the
parameters (completion, display…).
Activity backup and restore
It is possible to make a copy or backup of individual activities in a Moodle course and then re-use
these activities in a different Moodle site or in another course on the same Moodle. (Note that if you
wish to re-use activities within the same Moodle it might be simpler to use the import function.) To
proceed, you need be in the activity and the chose “Backup” in the administration menu.
You can then restore it to a course in another Moodle site.
Import course data
Course activities and resources may be imported from any other course that the teacher has editing
permissions in. This will allow teachers to re-use instead of re-creating one or
more activities or resources.
Import course data is similar to a backup and restore process and does not include any user data.
1. In Administration > Course Administration, click on the Import link.
2. Select the course you wish to import from and click Continue.
3. Select the elements you want to include in the import in the Schema settings step.
4. Review and click Perform import or click the cancel or previous buttons.
You should see the "Import complete. Click continue to return to the course." message, or an error
message indicating that the import process did not take place.

E – Learning Lecturer Guide
Revision 2019
Page 30 | 30
Data reuse at course level
Note that the following operations usually concern larger datasets. Before performing any of these
you may want to contact the Administrator to make sure you are going against Moodle
administration or storage best practices.
Reset a course
This allows you to empty a course of user data, while retaining the activities and other settings.
Please be warned when choosing items you will delete your chosen user data from this course
forever!
1. Log in and go to the course area you want to reset
2. Resetting a given activity is irreversible, so ensure that you have a Backup
3. In your area's Administration block, click on Reset
4. Click any Show Advanced button to show all options for that category
5. Make your selections based on the options
6. Click the Reset button
7. Return to your area and check that things are as you want them.
Course backup
A course can be saved with some or all of its parts by using the course backup. To backup a course:
1. Go to Administration > Course administration > Backup
2. Select activities, blocks, filters and other items as required then click the Next button.
If your course is too big (you have a high number of files or very big files), it may exceed the backup
size limit and can cause an error. The reason for this error will not be displayed (e.g. Size limit
exceeded). In this case you need to contact your Moodle administrator.
Restoring a course backup
A course backup file (.mbz) may be restored from within any existing course for which you have
permission. During the restore process, you will be given the option to restore as a new course or into
an existing course.
1. Go to Administration > Course administration > Restore (if you have an empty course to
restore into.)
2. Upload the backup file or choose a file in the course backup area or user private backup area
and click Restore
3. Confirm - Check that everything is as required then click the Continue button
4. Destination - Choose whether the course should be restored as a new course or into an
existing course then click the Continue button
5. Settings - Select activities, blocks, filters and possibly other items as required then click the
Next button

E – Learning Lecturer Guide
Revision 2019
Page 31 | 30
6. Schema - Select/deselect specific items and amend the course name, short name and start
date if necessary then click the Next button
7. Review - Check that everything is as required, using the Previous button if necessary, then
click the 'Perform restore' button
8. Complete - Click the continue button